Flameless candles for photography props deserve a decision based on the actual product, the way the space operates, and the maintenance someone will perform. This guide uses Zabicat’s current listing details as the factual product context, then separates those facts from practical editorial advice about fit, placement, control, and care.
The aim is not to make an electronic candle sound like a burning candle. For flameless candles for photography props, shoppers should judge a stable body, a flame-shaped LED component, the correct power routine, and a scene where the product can be used honestly. Measurements and product instructions should always take priority over a staged photograph.
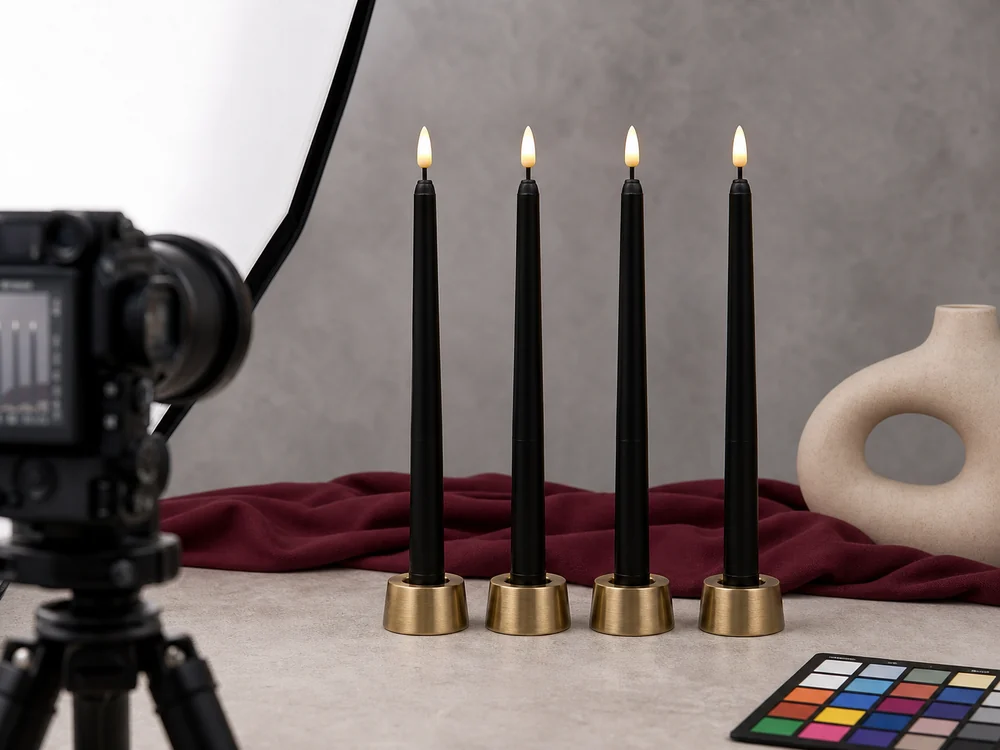
Product context: Review the primary Zabicat product, compare this related electronic candle option, and read the relevant Zabicat guide. The primary listing specifies a 12-piece black or white plastic taper set, about 28 cm or 11 inches high and 2.1 cm in diameter, with warm white flickering light, manual twist operation, and two AAA batteries required per candle but not included.
Flameless Candles for Photography Props Start With the Brief
Flameless candles for photography props can support product, editorial, portrait, holiday, or hospitality imagery without hot wax and combustion on set. Define whether the candle is the subject, a recognizable electronic product, or a background shape. That decision controls focus, quantity, exposure, and how accurately the body and tip must appear in the final frame.
The referenced Zabicat set includes black or white 11-inch plastic tapers. Black creates a strong vertical silhouette against pale gray, stone, or colored fabric. Use one color per composition unless contrast is part of the brief. Record the exact product and variant so selects, captions, and client approvals do not combine imagery from a different candle model.
Fit Every Taper in a Stable Holder
A rigid 2.1 cm base may not fit every candle cup. Test the holder before the camera and lights are positioned, and never force or shave the electronic body. Use only compatible purpose-made inserts when needed. Heavy low holders reduce the chance that a cable, reflector, or backdrop adjustment tips a tall 28 cm prop.
Level the tabletop and inspect each taper from the camera position. A one-degree lean becomes obvious in a repeated row. Mark approved holder positions with removable studio methods that do not touch the candle. Keep grip arms, flags, and lens movement outside the fall zone, and remove the set before rebuilding the background.
Photograph the Electronic Tip Honestly
The primary product has a short dark support stem and an opaque leaf-shaped LED component. Preserve that construction. Do not add a wick, smoke, melted wax, or a transparent flame in retouching. If the campaign is for the actual product, shape, seam, color, and operation must remain truthful across hero images and detail crops.
Capture powered and unpowered frames when the brief needs both. A slower shutter may exaggerate flicker variation, while a very bright LED can clip to featureless white. Bracket exposure and inspect the histogram, but retain enough detail to show a molded electronic tip. The goal is controlled glow, not an effect that changes the product category.
Control Black Materials and Color
Matte-black plastic can lose edge definition against a dark backdrop. Use side or rim light to separate the body without making it glossy, and place a gray card or color target under the final lighting. Burgundy, cream, brass, and concrete can provide contrast while keeping the set restrained. Check the result on a calibrated display.
Avoid crushing shadows so far that the lower seam or holder fit disappears. If a client selects the white variant later, repeat the lighting test rather than recoloring black bodies in post. Color substitution can misrepresent surface response and the actual option. An accurate source capture supports trustworthy product marketing and easier revision.
Match Batteries and Operation
The listing says each candle requires two AAA batteries and uses manual twist operation. Install matched cells with the specified orientation before the shoot and close every compartment fully. Test the complete group for even brightness. Do not mix old and new cells merely to finish a frame; variation becomes visible when four or more tips are aligned.
Keep spare and depleted batteries in separate closed containers away from metal grip tools. Record the installation date and identify weak units. During a long session, review output between setups because exposure settings can hide gradual dimming. Switch and handle each taper by its body so the electronic tip is never used as a control point.
Apply Studio and Open-Flame Context
The NFPA candle safety guidance provides context for avoiding burning candles near backdrops, paper, fabric, hair products, and busy crews. LED tapers remove combustion and wax drips, but stands, batteries, trip hazards, electrical lighting, and falling props still require a studio safety plan.
Flameless does not mean the prop can be clamped, drilled, painted, or placed anywhere. Follow product directions and studio risk procedures. Keep candle-style LEDs separate from hot continuous lights and wet special effects. When people enter the set, confirm reach, eye level, and the route to the camera before the next exposure.
Reset and Archive the Prop Set
After the shoot, count every candle, holder, insert, and battery. Photograph the successful layout with measurements and save lighting notes, white balance, exposure range, and product variant. This record makes reshoots consistent and prevents another team from rebuilding the scene with a different taper height or unsupported edit.
Store tapers horizontally in divided rigid slots away from stands, clamps, and brass holders. Flag pressure marks, cracks, loose battery doors, or inconsistent light. A documented reset keeps flameless candles for photography props ready for repeatable images and supports an honest chain from physical product to final asset.
Decision Notes for Flameless Candles For Photography Props
Measure the display: Measure holder cups, taper bases, complete frame height, camera crop, backdrop distance, reflector clearance, subject reach, battery access, and the spacing needed to prevent overlapping silhouettes. Write the dimensions beside the product listing before ordering. This small step prevents a decorative image from overriding holder fit, access, and the true amount of space available.
Identify the likely failure: The studio failure is building a beautiful frame around leaning tapers, mixed light output, clipped tips, inaccurate color, or edits that misrepresent the electronic product as a burning wax candle. Planning around the weak point creates a more reliable result than adding features that do not solve the daily problem.
Define the routine: Fit and level every holder, install matched batteries, create a gray-card reference, test exposure, photograph the powered and unpowered states, count props, and reset them after each setup. A repeatable routine is evidence that the product suits the setting. If the process sounds inconvenient before purchase, another power type, pack size, or candle shape may be the better choice.
A Practical Evaluation Worksheet
Create a one-page worksheet before buying flameless candles for photography props. In the first column, record only facts visible on the current product page: dimensions, quantity, power source, included controls, timer choices, charging or cell requirements, body material, and light-tip design. In the second column, record facts about the destination: available width and height, holder dimensions, outlet access, moisture exposure, viewing distance, operating frequency, and the person responsible for maintenance. A product belongs on the shortlist only when both columns agree.
Then run a small scene test for flameless candles for photography props instead of decorating the whole room at once. Use one holder or tray, photograph the candle while switched off and on, view it from the normal seated or standing position, and practice the full service step. That step may mean lifting the unit for charging, opening a battery door, cleaning a recessed top, or collecting several pieces after use. The test reveals practical friction that specifications alone cannot show, while keeping the recommendation grounded in observable evidence rather than assumptions.
Care, Storage, and Product Review
Handle tapers by their black bodies, dust with a dry lint-free cloth, protect opaque tips from clamps and cases, and store candles separately from heavy stands and grip equipment. Protect the light tips from pressure, keep accessories with the set, and stop using any piece with visible damage. Clean condition matters because dust and residue alter both close-up appearance and light spread.
For flameless candles for photography props, review the product page again when reordering because pack contents, controls, and specifications can change. This article was checked against current Zabicat listing details on July 14, 2026. The styling recommendations are editorial guidance, not a laboratory performance test or a substitute for the manufacturer’s instructions.
FAQ
Can photographers add a wick or smoke in post?
Not when the image represents the actual electronic product; preserve its molded LED tip and construction accurately.
Why do black tapers need side lighting?
A controlled edge or rim helps separate matte-black bodies from the backdrop without changing their surface color.
How should a studio prevent uneven LED brightness?
Use matched specified batteries, test the complete group, record dates, and remove weak or inconsistent units before shooting.
Bottom line: Choose flameless candles for photography props only after the size, power routine, electronic flame shape, control method, and maintenance plan all fit the real setting. A clear product match creates better decor and fewer surprises than a purchase based only on a distant glow photo.